Friday, April 15, 2016

Traditional Christmas Dinner


It's been too long since my last post.  The beginning of a new school term means I have to spend a little extra time at work so I have found it hard to find time to build.  Stupid paper work.  Some weeks it can be a real uphill battle just to get a little time to myself to do some quality building.  Poor me!


This is definitely my favourite interior so far.


The black and red is very effective here and I think the wall decorations worked out pretty well.


Next step is building the last sliding rear wall in which I hope to include a medieval toilet.  Even minifigs need somewhere to relieve themselves.


Monday, April 4, 2016

My Kitchen Rules, 15th Century


Preparing breakfast, medieval style.  Years ago Tim Gould gifted me a big bag of 2 x 2 light bluish gray tiles and never have they been so useful.  Thanks Tim!


OK, so the chef's hat might be a little off as far as medieval headware is concerned, but you can't tell me you don't know who the head chef is in this picture.


I wanted to add as many kitchen objects as I could and was fairly conscientious of how the kitchen would work in reality.  Of course I couldn't cover everything.  There is no oven and no way to dispose of waste.  Maybe that's what the pig is for...


Interior 2nd Floor

Flare Michael Bay would be proud of
I wasn't going to include this shot at first, and I definitely won't post this on flickr.  This shot was taken in the same photo shoot as the last post.  At this stage the second floor interior is largely unfinished but it gives you a fair idea of what I have to work with.  It also provides a glimpse at how those windows work as well.  The doorway, although vacant here, already features a brick built door which will feature in a later post.  Check out my next post for details on the completed right hand side.

Thursday, March 17, 2016

LEGO Castle Jenga


This is one of those 'I love it when a plan comes together' moments.  I'm often astounded at how much we can hold in out heads, it's incredible.  Up until this point what you see was only an idea, it's such an incredible rush when you actually make an idea real.  I'm sure you know what I'm talking about.  I know it's not like I'm building the Mona Lisa here, but it's great to be at this stage.

The lower level still needs an interior and lacks a rear wall.  Once again I'm facing parts shortages but at least I can concentrate on the interior until I sort out my plastic allowance for this week.

Also, the castle has it's own ghost now, Sir Spookington Mc Boo.


Sunday, March 13, 2016

Roofing Issues


Although not exactly what I originally planned I wasn't displeased at all with how the roof came out in the end.  At first I wanted to have the roof slide out as one single piece once the back wall was removed but it proved clunky and a little destructive.  You can see the horizontal slots in earlier pictures of the interior.

I even made the roof section a stud narrower but it didn't do much to alleviate the problem.  The stress was so great I ended up leaving it 1 stud short of the original width, which adds a small design aesthetic that only the creator can truly appreciate.

Intentionally crooked
The above shot really makes me want to work out some kind of lighting solution.  This model would really benefit from a model lighting kit or something.  I still need to work out a better solution for the flagpoles - I'll probably just use some flexitube in the end, a anything else makes them look too segmented and unnatural.


I've already started on the next level which I plan to include a grand balcony, a dinning hall and maybe a medieval loo.  Let's hope I can get at least two of those features in, I already foresee part shortages and even have a Bricklink tab open as we speak.  If only the Australian Dollar was worth anything anymore ... why am I always building when the local economy is going to the dogs?

Thursday, March 10, 2016

Progress!


There's finally something worth blogging about.  It's been a difficult couple of weeks.  Work and home life have been a little busier than usual and it's been hard to find the time to build and post.  I've had a couple of part shortages too, most especially 1 x 1 modified bricks with a stud on one side and headlight bricks.  I have tried to keep it down to one order a week so far, and I must admit, I feel guilty typing that out.  But it's mostly been for little things and costs have been relatively low.  And it's not like I didn't realise what I was getting myself into when I fist started.

This is a view from the rear.  The roofing is complete but I'll cover that in more detail in a future post.  The entire rear wall of this section slides up and out to reveal the interior.


I'm still not happy with the flag poles and am likely to change them in the future.  The two roof sections look slightly out of place here but works quite well when the interior is not exposed.


The wall section slides into slots in the rear walls.  It was a lot clunkier than I originally anticipated do to the inherent misalignments in the bricks but actually improved over time and use.  It would be great to get some lighting working in this model, but I am really unsure which method would work best between the 80's lighting kit, yellow, battery powered light bricks, or a custom solution.  If anyone has any suggestions let me know in the comments.

Monday, February 15, 2016

WIP update: Interiors 'Complete' for Upper Level


After a long and frustratingly UN-LEGO week it was great to get back to my project.  I had started on my interior earlier but was waiting on a bricklink order to arrive so I could complete it.  I tinkered a bit here and there and encountered some issues with the roofing - I'll cover that in a later post - and went over some of the interiors I had built in the past to see if I could inspire myself.


Looking back at some of my older castle themed builds I noticed the interiors were often added as an afterthought, and always added at the very end.  I remember there was often a sense of rush when I was adding these details - the exterior was done and I was keen to get it posted, mostly because I believed my building defined my participation within the community.  If I wasn't building and posting then I wasn't part of the game.  And let's face it, few people will follow the links to the more detailed pictures, it's very much about that first image.  My last few builds - the medieval village - has no interiors at all.


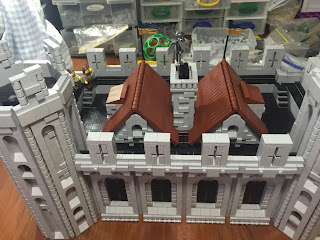
Well, no rushing this time round.  I have limited time as it is so I was determined to take it easy and make this right.  I have tried to put as much effort into these two rooms as I would a creation that was solely an interior diorama without an exterior.  Originally I wasn't to make the scene into a mini vignette just for this shoot but I was so creatively drained I couldn't think of a thing!  Of course once the shoot was finished multiple comic scenarios occurred to me but by then it was too late. 


Fighting that creativity drain can be hard.  I currently work as a music and guitar teacher so I am playing music and flexing my creative muscle all the time.  Sometimes my brain muscle is just too exhausted to think beyond my previous planning.  It's weird to explain, mostly the inspiration just flows, but in times like these I feel like my head is empty.  It's like you can hear the wind whistling through my ears.  Stupid wind's too loud, it won't let me think!  I think next time I'll put it off for twenty four hours and approach it with a fresh head.

Still it's not like the interior didn't work out!  It's just not as funny as it could have been - which was totally hilarious I assure you.  Maybe next time...